American Bushman

"If you would not be forgotten as soon as you are dead, either write things worth reading or do things worth writing." —Benjamin Franklin

Wednesday, May 31, 2006

Book Club:What to Expect

In Chapter 2, Rustrum talks about what a novice should expect in the wilderness. He also reinforces some of the things I've always believed to be true and things I've been teaching my children about the outdoors. For example, I tell them to never panic and Rustrum says, "often courage and good judgment carry the inexperienced over many unpredictable hurdles." If you keep your head when in the wilderness you will be far better off than those who do not.

We, as humans, have an incredible ability to adapt to a situation and life in the cities and towns has allowed us to forget that to some extent. Rustrum strikes a chord with me when he writes, "It should be apparent, therefore, that apprehensions of youthful inexperience or old age, qualms common to the uninitiated, should not prevent anyone from enjoying the wilderness." Less than two years ago I was one of the uninitiated and now am confident in my ability to survive off the land for an extended period with a few basic tools, the strength of my back, and the knowledge in my head.

The author also touches on the backyard campsite, a personal favorite of mine, when he writes:
In expectation of wilderness living, we can certainly derive pleasure while we are learning and adjusting. Pitching a tent, swinging an ax, baking a bannock in the frypan before an open fire, and a dozen other camp functions can be practiced profitably in an urban backyard, if they are done by the best-known methods and with a zest for learning.
It is this controlled environment I find most suitable for teaching my daughter the basics of camping out. She is willing to be bold and take risks just as long as the house, and mommy, are within view.

Thanks for reading,

B

Tuesday, May 30, 2006

Book Club:The Wilderness Point of View

In this first chapter of "The Wilderness Life," Rustrum is already laying the foundation for this book along similar lines as Thoreau's "Walden." On two or three occasions he actually quotes Thoreau in this chapter.

He argues for the regenerative force found in nature. Anyone who has been on a day hike and then had to return to "real life" knows there is something to be said for the ultimate simplicity of the outdoors. To top off the simplicity, it's all free:
The sun rose and set in all its glory ever anew each day without financial or material aid. The rain fell on the forest bloom to keep me ceaselessly contemplating its magnificence though no hand cultivated it nor turned any watering spigots. Trails through the wilds, which I had no part in blazing, had been provided by the treading of its forest creatures for ages. I was given twelve breaths of pure, invigorating air every minute at no cost, by the miraculous conversion forces inherent in vegetation. The fuel needed for my tea pail and bannock-baking fire was supplied merely by reaching for it and using an ax to render it fit for my immediate use. The stage for my entertainment was set in the most dramatic style wherever I turned: vast waterfalls fell in spellbinding, thunderous spectacles to amaze, while along the river wildlife played their repertorial parts, though I paid not a single penny for admission. (pp. 9-10)


This chapter has set the tone for the book and it should provide some interesting reading.

Thanks for reading,

B

Monday, May 29, 2006

Bugs

Days and days of rain followed by 70°+ temperatures means the bugs are coming out in force. I live on the river and the number of bugs in the yard has literally exploded over the past 48 hours. The temperatures at night are too warm to kill off many of the new pests and it's going to get worse before it gets better.

There are, of course, ways to deal with the bugs including Permethrin, DEET, bug netting, and citronella.

With the bugs come the spiders. Last year was a good year for the spiders and this looks the same. There wasn't a week in the woods last summer where I didn't end up with at least one thick web across my face. Spiders...heh...love 'em.

Thanks for reading,

B

Friday, May 26, 2006

American Bushman Book Club


Over the course of the next three weeks (starting Monday) I'm going to read Calvin Rustrum's "The Wilderness Life." This book is a follow-up to his sleeper hit "Once Upon a Wilderness" and "was written with the advantage of already discovered reader appeal" according to the author.

I intend to read one chapter each night and post my thoughts the following morning.

Pick up a copy and read along. If this works out there could be lots of "group reads" in the future.

Thanks for reading,

B

Thursday, May 25, 2006

Hammocking update

Around Midnight last night the hammock started getting soaked. The storm blew in and the rain came sideways right between the tarp and the hammock. Not fun. I hadn't changed the pitch of the tarp and the hammock was hanging pretty low to be offered much protection.

Around 2am I started to get sick.

By 4am I had lost 6 pounds. (I'll let your imaginations figure that one out.)

By 6am I was in bed trying to recover. Then the kids woke up and came bounding in to request their breakfast.

Where's the coffee?

Thanks for reading,

B

Got a(nother) new knife

After MUCH deliberation this one followed me home. The knife is the BRK&T Snowy River in 12C27 Stainless with blaze orange G10 handles and red and white spacers. The knife just fits my hand.

The reason for such extensive deliberation had more to do with handle choice than any other reason. I had available a natural canvas micarta handle, a natural linen micarta handle, and the blaze orange handle. All three were beauties and I've recently been enamored with the natural canvas material but the orange won out.

The specs:
  • Overall Length:8.125"
  • Blade Length: 4 "
  • Blade Steel: 12C27--58rc
  • Blade Thickness: .129"
  • Weight: 3.375 Ounces.


To describe the knife as light but sturdy would be an understatement. The knife reminds me of the Scandi knives I recently picked up from Ragweed Forge with a few differences. The Mora (Frosts of Sweden and Eriksson) knives are Scandi ground which means the edge continues straight up the bevels to the flat. The Barkies are fully convexed meaning the edge goes all the way up to the spine in a convex shape much like a lens--a VERY sharp lens.

As to which type of edge might be easier to maintain and sharpen, it'd be a toss-up. Both types are fairly simple with just a little bit of know-how and a little courage.

I won't be doing any kind of head-to-head comparisons with the Snowy and one or more of the Mora Knives as they're not apples of the same variety. It'd be akin to testing a machete and a golok. Sure, both will be awesome choppers and capable of other tasks but they're just not "same enough" for me to do a comparison.

Thanks for reading,

B

10 Years

Today is my 10th Wedding Anniversary.

It's hard to believe it's already been that long. Seems like only yesterday we were getting married.

There have been some challenges but, given the chance, I'd do it all over again.

B

Wednesday, May 24, 2006

Testing the hammock setup

A big storm is supposed to blow in tonight with big wind and rain. I think I may have to spend a little time out in the hammock to see just how well I've set everything up.

The Hilleberg 5XP is the perfect length for my hammock (actually my daughter's hammock pictured below) as it overhangs the ends by about 1'. The width provides a great deal of protection and, pitched as an a-frame, I can drop the sides down quite low if the rain starts blowing in.

I wish the hammock sat up higher when I was in it but I'm afraid a few extra snacks and gravity are finally having their say.

Wish me luck,

B

Tuesday, May 23, 2006

Hanging the hammock

It's getting to be that time of year again where I pull out the hammock and hang it in the back yard at our "campsite" so the kids and I can go swing between the trees during the day if the spirit moves us. I've got some ideas this year on pitching a tarp over the hammock using bungees to attach to the hammock lines but it will take some experimentation.

Normally, if you attach your tarp to the same lines your hammock hangs from you'll see the tarp go slack every time you climb into the hammock. That's because you're shortening the distance between the ends of the hammock. Pitching the tarp so it's taut when you're in the hammock would leave it split in two once you climbed out (or at the very least over-stretched.)

My current pitch involves tying the tarp to a ridgeline (timber hitch on one end and trucker's/wagonner's hitch on the other.) Pull the ridgeline taut and, with the tieouts/grommets on the ridgeline, tie klemheists to the ends and bring the peak tight. Then, tie out the guylines using a clove hitch on as many pegs as needed (could be four or could be more.) The bungees would replace the guyline and the klemheists.

This setup will require some time to convince me it is viable. I already know that my current setup will withstand some pretty wicked weather and will require little or no maintenance over a multi-day trip (i.e. adjusting for sagging cordage due to wet and/or cold.)

Time will tell...

Thanks for reading,

B

Monday, May 22, 2006

Ugh

I am NOT happy with the formatting of that last post. I spent an hour working on the HTML to make sure the layout was just as I wanted and...that is what came out?!

The basic look of American Bushman may be changing but the content will remain the same. I've got to find a layout that better matches the editor window.

Thanks for reading,

B

A gallery of pictures


These are all pictures I've taken since January '05 using a Nikon 4500 digital camera. I've taken lots of pictures with it. Some of these I've already posted and some you'll see here for the first time.

(Click for larger image)


BRKT Mini Axe & CanadianKids eating
Fox River & SAK PioneerMikro CanadianDes Plaines River View
WaterfallBaby Mallard
Bachelors ButtonCattail FluffCanSpec & Visitor
Irie MFKSimonich SalishScout Firesteel
Lil Nessy


My gallery,

B

Sunday, May 21, 2006

Thank You

To those of you who are reading:

Thank you.

I've had visitors from 15 countries and nearly every state in the US in the past month.

Some of you have been here from the beginning and some of you may be reading for the first time. I hope you are all finding things worth reading and that you'll come back and read some more in the future.

I hope you feel it has been time well spent. I will strive to keep it interesting, educational, and entertaining as we go forward.

Again, thank you.

B

Saturday, May 20, 2006

The Mora Knife

Having read about the Swedish Mora Knife for quite some time, and never having owned one, I felt it was time to rectify that situation. The Mora knife is made by Frosts of Sweden and KJ Eriksson.

Blades come in stainless, carbon steel, and laminated carbon steel in a variety of handle shapes and colors. Blades come with a Scandi Grind which means the edge angle is the same all the way up the bevel. Some of the knives ship with a secondary bevel but it's easy enough to take that off with the initial sharpening. When I asked Ragnar about the tempering on the blades this is the response I received, "As indicated on the web page, the knives you ordered are uniformly hardened. The laminated blades are hard in the center and soft on the sides, the triflex blades (680 and 780) are harder at the edge and softer at the spine."

What does that mean? It means the carbon steel knives can be used to strike pieces of flint and they should throw sparks. That's EXCELLENT news.

I got mine from Ragnar at Ragweed Forge. This is not my first order with Ragnar and it most certainly won't be my last. The level of service has been excellent and he's got everything (at least everything I ordered) in stock. Not only does he have Moras of all shapes and sizes but he's got other blades, axes and hatchets, some really neat wooden tableware, and lots of viking jewelry and accessories.

Somehow I managed to pick up 3 carbon steel knives, 3 stainles knives, and a set which included a draw knife and two crooked knives. That's right, 9 knives...plus a noggin.

In general, the handles are a bit oversized but quite comfortable. A few of the knives are shipped with ambidextrous sheaths but they're mostly right-handed only. That's fine by me. Being a Southpaw, I've dealt with right-handed products my entire life.
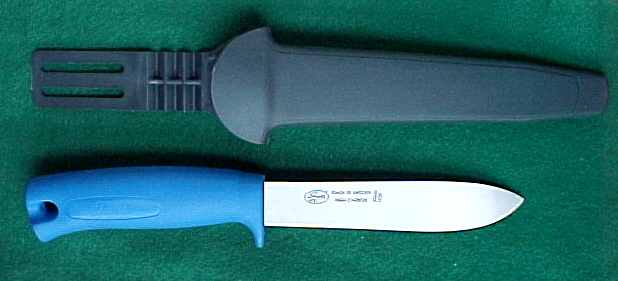

The Mora 2000 ought to be my favorite, the carbon knives ought to be my favorite, but it's the blue-handled fishing and game knife that really gets me going. Ragnar's got it listed as the S-0125. (Photo courtesy of RagweedForge.com)

Actually, of the 9 knives I managed to get my hands on several have already been claimed. My daughter immediately snagged the 740 which has a bright red hard plastic handle and a carbon steel blade. She doesn't know that was the knife I bought for her anyway.

After playing with all the blades for a short while I decided to tackle sharpening just to see how it would be done on a Scandi Grind. The basics of sharpening a Scandi Grind are quite simple. Lay the knife flat on the stone, lift the spine of the knife until the bevel is flat on the stone, and take imaginary slices off the top of the stone. Once you've established a wire edge, flip the knife and repeat. Take this process through the various grits until you've got the kind of edge you're happy with.

I used a 10" DMT stone to establish the edge on the Mora 2000 and found it quick work to get the edge and then I just stropped it on my new strop board until it'd pop hairs right off my arm.

Now the Mora 2000 (M2K) has an interesting grind that changes toward the tip of the blade. I only sharpened the part toward the handle as I don't yet know the reason for the changed geometry and don't want to mess it up due to the experiment.

I'm not sure that these knives would replace my standard go-to knives for a trip to the woods but for the weight and price one will surely be along as a loaner for those that need a knife. They're NOT getting my Gameskeeper if they came out into the woods without a knife. I'm a nice guy but I'm not that nice.

Thanks for reading,

B
Friday, May 19, 2006

One more for today


My Osage Orange Lil' Nessy from Bark River Knife and Tool alongside my Vintage Knives Moose. Awesome pieces of history here. I hope my photo starts to do some justice to the job Mike and his crew have done.

Thanks for reading,

B

Some of the pictures I've been talking about


The spoon I'm working on is really coming along. Carving inside the bowl with the Mini Northstar is going to be tough but I'm committed now to finishing it with one knife.

Dan whipped up the strop board last night while I was hanging around the shop. It's just as I had written with the included lanyard hole. I threaded it last night once I got home but will take the paracord out today and ream the holes to give them a more "finished" look and then rethread the cord. Next I've got to load the sides with compound and then get to work touching up the edges on my blades.

B

Thursday, May 18, 2006

Neck Carry


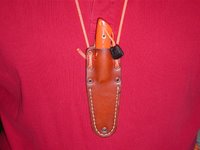
I've recently taken to carrying a BRK&T Mini Canadian around my neck Nordic style. I hesitate to call it a neck knife because I envision those being carried handle-down rather than blade down as I carry mine.

The original sheath was not conducive to neck carry but the new sheath from JRE Industries works extremely well for this mode. You can see the eyelets around the perimeter that work well with the paracord to make a rig that hangs well, is strong, and darned good looking. (Sure, the orange doesn't go so well with the red shirt but you get the point...)

You may see the small burn mark on the front of the sheath. This is one that I had a hand in finishing at JRE. I was using a soldering iron to melt the ends of the thread and effectively branded my sheath. I had to have it and made a special request to get it. The quality of sheath coming out of JRE is so incredibly good that to get an "irregular" sheath (even one of my own doing) makes it a rarity.

All I've done is run the paracord through the lower hole on one side, back through the upper hole on the same side, around my neck, through the upper hole on the opposite side, and through the lower hole on that side. The ends are tied off with a simple overhand knot, the cord is cut, and burned to prevent fraying. Using two eyelets per side really helps to stabilize the sheath and prevent it from "tipping" over when I move quickly forward or side to side.

I had a firesteel attached to the cord for a short while yesterday but it got to be a bit too much. I've got the guys at JRE working on a method to attach a firesteel right to the sheath that should allow a more discreet carry without adding bulk.

I've got plenty of custom leather from the guys at JRE and have plans for quite a bit more in the future. That, however, is a topic for another day. For a production sheathmaker they put out a product that is as good as (if not better than) any of the custom sheaths I've owned over the past several years.

Thanks for reading,

B

Wednesday, May 17, 2006

Knife Maintenance

Found this on the Kellam Website the other day and want to try making one of my own.

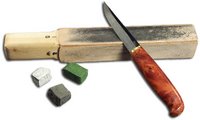
"This is a great leather strop tool for that finishing touch that goes a step beyond the capabilities of stone sharpening. It is four strips of specially prepared leather, attached to a 4-sided stick. Great for micro-aligning the edge of your blade for that razor sharp finishing touch. Great for keeping your puukko knife extremely sharp between tasks. Just 4 steps to a dangerously sharp finishing touch. Includes 3 abrasive compounds for each step in the sharpening process."

Here's what I'll need:

  • 10" section of 2X2 lumber

  • 4 pieces of 2" wide leather

  • Contact Cement

  • Polishing compounds (black, green, and white)

  • Sharpie or wood burner for marking the handle


Cut the leather 2" wide by approximately 6" long and glue one piece to each side of the wood. Carve/sand the "handle" portion of the wood until it fits comfortably in your hand. Apply compound to three of four sides. Mark on the handle the order in which to finish (black, green, white, plain.) Done.

When finished I might drill a hole in the handle to hang the whole contraption by a lanyard.

If your edge is severely damaged you can also put a piece of wet/dry paper over the leather and strop your knife back to sharp and then go to the compounds.

Thanks for reading,

B

Tuesday, May 16, 2006

Spoon Carving

For the past several weeks I've been working on carving my first spoon.

I had always intended to carve one but after the hand injury I've been sorely lacking the strength and endurance in my right hand to spend much time on it. Then I read this post on Pablo's blog and decided to really commit myself to getting the spoon done while my kids were asleep. (Being a stay at home dad does afford me some opportunity to practice my skills during the regular work week.)

What makes spooncraft, as Pablo so appropriately calls it, so difficult is that I know what a spoon is supposed to look like. I've seen spoons my entire life. Whether they be made of metal or plastic or wood they all have looked, more or less, the same. Mine doesn't look like any of them...yet.

This isn't some stylized rooster I'm working on but a utensil that I can hopefully use when I'm out in the woods. My mind and my eye are working together to remove the non-spoon parts. The going has been a bit slow but a spoon is slowly coming out of the wood.

I've got the rough shape completed and work on carving down the handle to a comfortable diameter has commenced. I've also started carving into the bowl and shaping the outside back of the bowl where the wood transitions into the handle. It's looking good to me but the outside observer might be hard pressed to see a spoon if it weren't for my pencil drawings on the wood.

Thanks for reading,

B

Monday, May 15, 2006

New Knives

Here are two of the knives I picked up while in Escanaba. Both knives have Osage Orange handles with red and white spacers. The knife on the left is the Lil' Nessy and on the right the Settler. Both pictures were taken by Mike Stewart at the shop.

I'll see what I can do about getting some pictures of both knives with the rest of my more traditional gear as soon as the weather clears.

George Washington Sears (Nessmuk) often talked about his "trinity" of tools. He carried a double-bit axe (really more of a hatchet,) a Moose pattern slipjoint, and a fixed blade knife in the shape of the Lil' Nessy. I have my own trinity of outdoor tools but I'll try it Nessmuk's way for a while.

Tomorrow will be my first opportunity for some time in the woods in quite a while. I'll only have a couple of hours but that should afford me enough time to at least get a few pictures.

Thanks for reading,

B

Sunday, May 14, 2006

Knifemaking


I have been out of town since Thursday night and had the opportunity to spend some time with Mike Stewart and the crew at Bark River Knife and Tool and to learn some things about knifemaking.

I have played around with the idea of making a knife from time to time but never really had a secure grasp on the entire process. After watching Steve, Skittles, Mikey, and the rest of the crew for just one day I both have a better understanding of the process and a greater respect for what these guys (and girls) do day to day.

While I was there, I had help from several members of the crew (Mikey, Jimmy, and Steve) to rehandle one of my existing knives and then had the opportunity to see two of my knives built from the ground up. Seeing the process is nothing short of amazing. There can't be a guy on the floor over 35 but they all handle the machines like they've been doing it their entire lives. I just wish I'd taken pictures of the entire process to better document the creation of these beautiful pieces.

The entire experience provides an interesting contrast. First, the shop was both exactly what I expected and not at all what I expected. I've been down to Vero Beach, Florida to visit Tony Marfione at Microtech and seen his operation. This was nothing like that. Second, Knifemaking is dirty work. Grinding steel and handle materials puts lots of dust into the air (and all over the surface of everything.) Yet the finished product is immaculate. Third, design takes just minutes but it also takes years and years to develop the eye to make it right.

I not only have a much better idea of what, precisely, to do in order to make a knife but I have a deeper and stronger belief that Mike and his crew are providing one of the greatest value, hardest using, great looking knives today.

Thank you to all the employees at Bark River Knife and Tool for making my visit not only memorable but also just a ton of fun. Mike and Lesley, thanks for taking the time to shoot straight, allow me in the shop, the assembly area, and the grinding room, and for inviting me into your home for dinner. Jimmy, thanks for helping me with my projects and providing me a place to throw my sleeping bag for a much needed rest.

Thanks for reading,

B

Thursday, May 11, 2006

Accessory Tarps

After last night's rain I'm fully convinced of the value of a 6'X 8' tarp. Mine is pitched as a lean-to out back and I collected tinder, kindling, and fuel wood yesterday and stored it under the tarp. This morning it was still dry on the surface.

Wet wood (wet on the surface) will still burn but it will take more heat to dry the surface before the wood itself will combust.

The tarp weighs very little, can be pitched with about 10' of cordage, and can provide shelter for your firewood, extra gear, or even an extra person--in a pinch.

Thanks for reading,

B

Wednesday, May 10, 2006

Working with the 5XP

I've drawn up the basic layout of the Hilleberg 5XP today to start playing around with pitching options. I'm not sure the direction I'm going to take here yet but I think I'll probably just get out and pitch the tarp various ways and shoot some pictures. The weather is supposed to be a bit nasty again today though so if I've got to protect the camera from inclement weather I'll do my best.

The tarp is 3.5m long by 1.45m wide (that's approximately 11'X4.8') and there are eight tieouts along the edges (four corners and midpoints on all four sides.)

Reading the Hilleberg catalog I noticed that the cords they've attached to the tarp are Spectra. Whoah! Spectra, for those of you who might not know, is a very high strength, low weight, and low stretch material. The more I know about this tarp the more impressed I am at the price point. Bo Hilleberg has done his homework and his whole family has grown up (literally) in and around his tents and tarps.

At this point I'd like to mention the catalog. I have actually enjoyed reading it. The products, manufacturing methods, and family history are all presented and the catalog actually tells the story of a man, his family, and their desire to make some darned good shelters that can handle even the nastiest of winter snows. You can get one FREE right here.

Back to the tarp...
Long skinny tarps have some advantage over their wider and more square bretheren. First, you're saving some unnecessary weight if you're confident in your ability to pitch a weather-tight shelter. Second, smaller shelters are easier to warm with body heat. Third, and some may say this is NOT an advantage, you have limited pitching options. I have a 9'X 9' catenary cut tarp with 17 tieouts and you can pitch it so many ways it is sometimes difficult to figure out what the "best" way might be. The 5XP will go up fast.

Some pitching options that come right off the top of my head:
  • flat lean-to
  • closed a-frame
  • open a-frame
  • wide-open "awning"

I've got a few ideas for additional pitches but don't know if they have names. Pictures will probably make more sense anyway.

At 11' long it'll also work well with my hammock. That brings up a whole other list of possible pitching options.

Thanks for reading,

B

Tuesday, May 09, 2006

Next big project

Today I'm setting things in place to begin reading and note-taking to advance my knowledge of animal tracks and signs.

I have several books on the subject and have spent some time flipping through them--enough to know that there is a ton I don't know. I will begin reading them one after the other, taking extensive notes, and getting out to look for tracks and sign often.

The two areas I had considered studying were tracking and wild plant identification. While the wild plants would be far easier to photograph and write up, I believe the animal tracking could lead me on some interesting adventures this summer.

Just this morning I nearly had a doe inside the house. If I hadn't made a bunch of movements and noise I'm not sure she would have turned in time to avoid the large windows in the Master Bath.

Life on the river can certainly be interesting...

Thanks for reading,

B

Monday, May 08, 2006

Continuing on a theme

Today I spent some time with Laura cleaning up the "campsite" behind the house. We raked out all the sticks and pulled as many of the weeds as we could. Next we started a campfire and put on a nice big piece of punky wood to smoke out the mosquitoes who have been raiding the back yard for days (one of the downsides to living on the river.)

We put down some foam pad for sitting/sleeping and read a story. Then we talked about the importance of paying attention to your fire at all times and the things that could go wrong if you didn't.

Laura's only 4 1/2 but she seems to understand an amazing amount of the information I throw at her. There's hope that I've got a lifelong hiking buddy here.

Once she'd had enough of the smoke we put water on the fire, made sure the embers were out, and stirred everything into the soil.

We're contemplating leaving the site up for the whole summer. It's far enough behind the yard that it won't interfere with the landscaping and the tarp isn't too much of an eyesore although the Hilleberg 5XP will blend in much better.

In the next few days we'll be playing around with pitching options on the Hilleberg tarp until we've got one we're satisfied with leaving pitched for an extended period. I'll try and get pictures and descriptions up for each of the methods.

Thanks for reading,

B

Sunday, May 07, 2006

Playing with the Kids

After finishing the baldric rig (not extremely pleased with the final result) the kids and I headed out to the back yard to set up a campsite. We took a blue poly tarp, some cordage, two tent stakes, and ourselves and set about pitching a lean-to shelter.

Once the shelter was up I discussed the proper distance from the shelter to set up your fire. I've read 1m, approximately 3 feet, or one good stride. We set up logs to reflect the fire back into the shelter, harvested a "y" branch to hoist a pot support stick, and split some logs for firewood, kindling, and tinder.


We discussed a few of the plants growing in the back yard and why one is called Mayapple(left.) I got to show them both male and female plants and we even had a few premature "apples" on one of them. The other we discussed was garlic mustard (right,) an invasive plant that just refuses to be eradicated despite continuous efforts by the Forest Preserve District and local foresters.

As the sun set the mosquitoes started coming out. I was carving a toggle for later use and felt one bite me right through two shirts and I told the kids it was time to run for cover. West Nile season is upon us and getting sick is NOT an option.

If we'd been camping out we would have gotten the fire going and let some wet leaves/sticks smoke the camp a bit to keep the mossies out.

Time "in the woods" is always better with good company and my kids make up some of the best I can think of.

Thanks for reading,


B

Baldric in progress

I'm working on tying a baldric rig for my BRK&T Gameskeeper using parachute cord (also known as paracord.) It's going slowly and my hands are suffering a bit. I've finally taken off the first layer of skin along the side of my right ring finger and had to cover up the raw layer with some tape.

This project is also complicated by the hand injury I sustained last October. I ruptured (severed) two contractor tendons in my right pinky and then, shortly after surgery, I tore the ligaments that stabilise the pinky. These injuries caused swelling, bruising, and eventually a joint contracture--basically an inability to straighten my pinky. On top of all that, the scar tissue has cost me the movement in the tip of the pinky. On top of all that, the strength and dexterity in my right hand has decreased significantly. I'd wager it was at about half of pre-October levels.

This means that tying a baldric that will eventually be some 40" long is really pushing my limits.

Thanks for reading,

B

Friday, May 05, 2006

Doing more with less

Working toward my goal of doing more with less I'm working to reduce single-use items from my kit and trying to see just how light I can go and still be comfortable.

What I've come up with so far:
  • Bark River Gameskeeper
  • Mucket
  • Firestarting Kit
  • Tarp
  • Cordage


Doesn't seem like a huge load but it'll provide me with several of the basics.
  • Gameskeeper = tools, utensils, firewood, etc.
  • Mucket = food prep, water gathering/purification
  • Firestarting Kit = fire, light, warmth
  • Tarp = shelter
  • Cordage = Too many uses to list


You can last up to 3 weeks without food (I can probably last 5 with the spare tire I'm lugging around) so bringing emergency rations with me falls very low on the list.

I'd probably also throw in some trash bags or zip-top bags just in case I needed to distill water.

The trick, as I've discovered, is not in making the list but in keeping the load restricted to that list. When I head out I too often double or triple the weight of my pack by adding unnecessary components "just 'cause."

Thanks for reading,

B

Thursday, May 04, 2006

Playing with the camera

Just messing around with the camera/tripod today in the kitchen after putting Sno-Seal on my sheath. I thought the pile of gear on top of the accent tile sample looked cool.

What you're looking at:

  • Bark River Gameskeeper
  • Swedish Army Firesteel
  • Fox 40 Mini Whistle
  • Fallkniven DC4 diamond/ceramic stone
  • Stainless steel mucket
  • 30 feet (or so) of black paracord


Thanks for reading,

B

Uh Oh


Found these beauties while playing on the playground at my kids' school yesterday. These are Poison Ivy in vine form climbing up the side of a couple white birch trees.

Poison Ivy comes in three forms (plant, vine, and bush) and can most easily be identified by the three-leaf configuration with the longer stem on the center leaf. Leaf shape can vary widely but the configuration cannot.

Poison Ivy vine can be easily recognized by the hairy vine which is just starting to form in the pictures.

Some small percentage of people (I don't know the actual statistic) are not allergic to the oils in poison ivy, poison oak, and/or poison sumac. I just happen to be one of them. This "immunity" can fade however so it's best to avoid the plants in all forms if at all possible.

Be careful out there,

B

Warning

I've been using an Aluminum 11oz. MSR bottle to store fuel for my Trangia stove for the past several months.

Yesterday I received word from Andy at CampSaver warning me that that was a bad combination and the alcohol could actually corrode the Aluminum bottle from the inside resulting in a)a loss of fuel b)a mess or c)a potentially devastating situation.

So, no aluminum bottles for your fuel if you're running a Trangia/soda can burner.

Check this link for more information on alcohol stoves.


Thanks for reading,

B

Wednesday, May 03, 2006

How cool is THAT?!

I just received an email from Petra Hilleberg. Check down just a couple of posts if you don't know who that is.

I'm a geek.

Getting email from Wiggy has always been a real pleasure and quite an honor (in my opinion) so it's not like the big chief hasn't contacted me before.

When they do, however, it's a BIG DEAL.

Awesome.

Anyway, we're talking about the 5XP seen below. That's right, I'm talking to Petra HILLEBERG about her tarp.

Holy cow!

I've got some pictures of the tarp now after a quickie pitch in the back yard but I'm a bit embarassed about the quality. I was trying to show her how I would pitch a tarp with these dimensions and my tarp clamps were slipping all over the Sil-Polyester whenever I'd put the slightest tension on them so the lines are all sagging in the pics.

You can see what I mean.

Thanks for reading,

B

Knife Testing

I've been working quite a bit lately on knife testing protocols. I would like, ultimately, to have one knife that I carried on a daily basis that would do whatever I asked of it.

Chopping 2X4s and cutting cardboard are standards in use today but I don't see either of those chores as being particularly realistic as the only time I've ever had to chop a 2X4 was when testing a knife.

Now building the firebow set or carving a spoon bring several different types of knife work into the mix.

Firebow set:
Chop
Baton
Carve
Scrape
Drill
Push Cut
Drawknife

That's a TON of information that comes from a single task. If the knife can make a bowdrill set you've covered a ton of ground. You can then take those different parts of the task and break them down to determine what it does well and what it does not do well.

Spoon carving:
Baton
Drawknife
Drill
Scrape
Carve

Again, a single task that requires several skills to complete.

There are others but these are the first two I'll consider. Both will be challenging as I'm still working on my first firebow set AND my first spoon. After my hand injury last year I'm still finding it hard to hold on to a piece of wood more than an hour or so before my forearm is just worn out.

Thanks for reading,

B

Monday, May 01, 2006

Friction firestarting


While doing some work yesterday with a Bark River Knife & Tool golok I tried to see if it was up to the task of sole blade during an outing. The argument has been advanced that you can do more big knife tasks with a small knife than small knife tasks with a large knife. For the sake of this argument we'll throw the golok into the knife category instead of the tool category which is where it more truly fits.

Using only the golok I sectioned out a piece of tree that had fallen on my property during an early February snow storm. I also harvested a large branch to use as a baton.

I have also been harboring an interest in starting a fire using only natural materials and the "easiest" of those methods seems to be the firebow. From a single piece of wood I can harvest the hearth board, the spindle or drill, and the bearing. All I'll need once this wood is dry is a green branch and some cordage to make the bow.

Here's my procedure:

  1. Split the section as close to center as possible.
  2. Baton the golok through the bark side of one half to create a "board" with two flattish sides.
  3. Using the golok as drawknife flatten the sides of the "board" so it will sit as close to flat as possible
  4. Baton the golok across the grain to split off a piece of "board" approximately 3-4" long (bearing block)
  5. Split the remaining piece of this half (batoned off above) and split it lengthwise into three (or so) pieces
  6. Carve one or more of those pieces down into a spindle. (I find it easiest to again drawknife the golok constantly turning the stick to get a nice even finish.)
  7. Straighten the spindle. I tie mine to something strong and straight and will turn it from time to time as it dries.


Now we wait...

I already know the golok is up to the task of harvesting firewood and building shelter but I had no real evidence to support my theory that it could be used for all knife-related tasks around the campsite. This, of course, excludes the knowledge that goloks and machetes, along with parangs, bolos, khukri, etc., have been used extensively for generations around the world as the only blade in a household.

I guess I just didn't know if I could successfully use it as my only blade. So far so good.

Thanks for reading,

B